23.4 Reference: The Right Mouse Button Menu
The right mouse button anywhere on a canvas will bring up a diagram specific menu. From here all of the operations are available, including those to save, print and export the file, to cut and paste, to select various objects or regions, to group objects and to layer objects, to operate on objects with various tools, and to edit the object properties and layout.
The middle mouse button will bring up an object-specific menu. Double
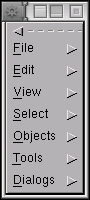 %
clicking an object will bring up the properties editor for that
object.
%
clicking an object will bring up the properties editor for that
object.
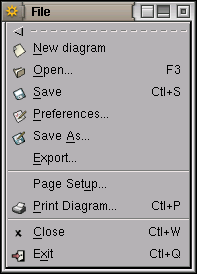
23.4.1 The File Menu
The File menu provides the usual
New diagram,
Open…,
Save, and Save As operations. Once again F3 (open)
is the keyboard shortcut to open a diagram from a file and
Ctl+S (save) is the shortcut to save a diagram to a file.
23.4.1.1 Preferences
With the Preferences… menu item you set the various options allowed by dia (this is the same as selecting File\(\rightarrow\)Preferences from the main dia window. These options affect new diagrams only, not currently open diagrams. To change options like Snap To Grid for a currently open diagram, use the right mouse button View menu.
The three categories of preferences for new dia diagrams are shown in Figure ??.

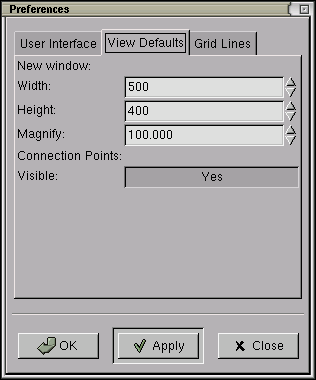
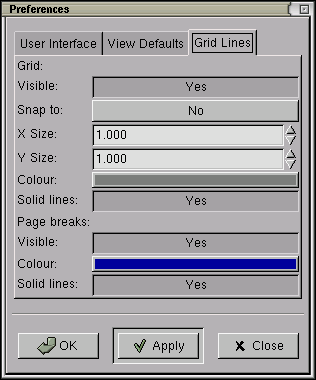
Setting preferences. {#fig:dia-preferences}
Under the User Interface the first option indicates whether the tools in the main window are reset to their defaults after creating a new canvas. The native dia save format uses XML which can be quite verbose. As with many GNOME applications it is common to compress the saved document (using the gzip format) and you can control this behaviour here. dia supports only a limited number of undo levels which can also be set here. Finally, reverse dragging, when enabled here, allows you to drag-select from the right to the left (unlike normal dragging which usually goes left to right) to have a different effect. It selects all objects that intersects the dragged rectangle rather than just those that are fully contained in the dragged rectangle.
View Defaults controls the size and initial magnification of the new window when you create a new canvas. You can also control whether the connection points (the blue crosses) are visible.
Grid Lines can be turned on and off. Objects can be made to snap to the grid (i.e., when you place or move objects they will move automatically to the nearest grid when placed). The size of the grid (both along the x and y axes) can be changed as can the colour and style of the grid lines. Page borders can be displayed on the grid using different colours and line styles.
23.4.1.2 Export
Export… is used to generate output suitable for other applications with a variety of formats supported. The format is either specified using the option menu or else determined by the filename extension:
Export to the common gif format is not supported because of licensing restrictions placed on users of applications that produce gif images. The use of gif images is not encouraged in the free software community because of this restriction. The png format is a superior replacement.
23.4.1.2.1 Export to TeX PStricks
TeX is a sophisticated document typesetting system. The PSTricks
TeX packages provide considerable support for PostScript within
TeX. This export filter generates a tex file for
processing by TeX (although usually LaTeX, an easier to use
macro package written in TeX, is used). To include the diagram in
your LaTeX document you will need to import the pstricks package
for LaTeX and input the actual diagram (as saved in
diagram.tex for example:
Depending on the version of LaTeX and PStricks you are using, you may need to uncomment some macro definitions in the diagram file. If LaTeX gives you the error something like:
You will need to remove the initial percent sign (LaTeX’s comment
command) from the definitions in diagram.tex and it is best to
rename the newcommand to providecommand in all three
cases (to avoid problems when including more than a single diagram in
the one LaTeX document:
All should then work.
23.4.1.3 Printing
When dia is compiled it will be compiled with either internal print support or support through the GNOME printing library. An alternative to printing is to export the diagram as PostScript which can then be printed.
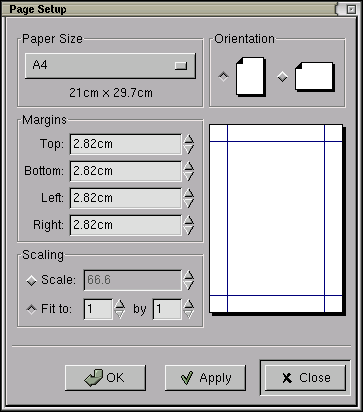
You can scale the diagram to fit the page when printing through the
use of the File\(\rightarrow\){Page Setup…}
menu. Here you can also set up the size of the page, orientation, and
the page margins.
 %
%
23.4.1.4 Quitting
The usual Close and
Exit items are part of the
File menu with their common keyboard shortcuts of
Ctl+W (close) and Ctl+Q (quit) respectively.
Close will close the current document while
Exit will exit from dia completely.
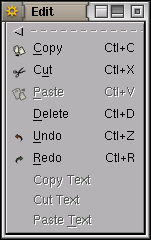
23.4.2 The Edit Menu
The Edit menu allows you to
Copy,
Cut,
Paste and
Delete objects with the common
keyboard shortcuts of Ctl+C (copy), Ctl+X (cut), Ctl+V (paste), and Ctl+D (delete),
respectively. Edit operations can be undone and redone. The number of
undo levels is controlled by an option in
File\(\rightarrow\)Preferences as we
saw in Section ??. The default is 15. That is,
you can recover from the last 15 actions!
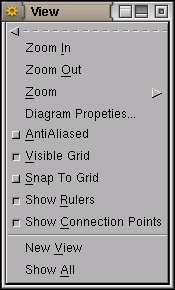
23.4.3 The View Menu
The View menu affects how you view the diagram. Zoom In enlarges the viewed diagram and Zoom Out contracts the viewed diagram. Particular scales can be chosen with the Zoom submenu. The Diagram Properties… menu allows the background colour to be changed and the grid characteristics (spacing and visibility) to be modified. These changes affect the current diagram only and are saved with the diagram.
Various features can be turned on or off with the following option
items.
 %
%
New View pops up a new canvas showing the same objects. Editing any object in any of the views will affect that object in all of the views.
Show All zooms the diagram to fill the viewable area of the canvas.
23.4.4 The Select Menu
The Select menu provides shortcuts for
selecting objects. All objects can be selected or None. Those
currently not selected can be selected in place of those that are
selected (Invert). For any selected objects you can cause those
objects directly connected to them to also be selected
(Connected). Doing this
repetitively results in all connected objects being selected, which is
the same as selecting Transitive.
Finally, you can select all objects that are of the same type as the
currently selected object. 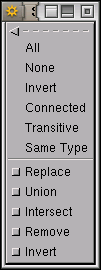
Selecting same type actually works even if objects of different types are selected.
The following five check buttons modify how new objects are selected. Usually a new selection replaces the old selection as the final set of selected objects. With Union the final set of selected objects consists of the previously selected object plus the newly selected objects. Intersection results in those object that were previously selected and now selected again to be in the final selection, but no others. Remove removes from the old set of selected objects those that are newly selected. And Invert causes those objects newly selected to have their state of selection inverted—that is, those previously selected and now newly selected be no longer be selected, and those not previously selected but included in the new selection will become selected.
23.4.5 The Objects Menu
The Objects menu allows you to layer
objects and to group and align objects. Objects can be selected
individually with the left mouse button by clicking on the object.
This allows a single object to be selected at a time. To select
multiple objects you can hold down the Shift key while you
click the left mouse button. Selecting with
the left mouse button actually toggles the selected
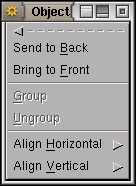 %
state of the object. You can also select a group of objects simply by
dragging the left mouse button (hold the left mouse button down and
move the mouse around) on the canvas to define a rectangular area.
When you release the left mouse button all objects in the rectangular
region will be selected. Of course, you can also use the
Select menu described above to select objects.
%
state of the object. You can also select a group of objects simply by
dragging the left mouse button (hold the left mouse button down and
move the mouse around) on the canvas to define a rectangular area.
When you release the left mouse button all objects in the rectangular
region will be selected. Of course, you can also use the
Select menu described above to select objects.
Once you have objects selected the menu items in the Objects menu become available. Send to Back and Bring to Front have the obvious meaning. Figure ?? shows the effect of selecting a Text object which is on top of a Box object and sending it to the back. The Box object ends up occluding the Text object.
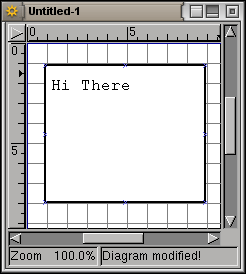

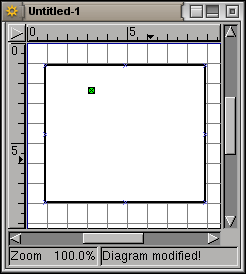 Demonstration of Send to Back: The Text object is
selected and then sent to the back, being occluded by the Box
object.* {#fig:dia-f2b}
Demonstration of Send to Back: The Text object is
selected and then sent to the back, being occluded by the Box
object.* {#fig:dia-f2b}
23.4.6 The Tools Menu
The Tools menu simply provides menu
access to all of the tools located on the upper area of the main
window. You will find the pointer (Modify), Magnify,
and Scroll tools. Remember, Shift with
Magnify or Scroll changes their behaviour. See
Section ?? for details. Next comes the four
standard shapes (Box, Ellipse, Polygon, and
Beziergon) followed by the five lines (Line, Arc,
Zigzagline, Polyline, and Bezierline). Finally
Image objects can be selected.
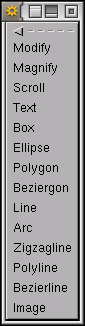
There is a significant reason for repeating the Tools here:
keyboard shortcuts can be easily assigned to each of the tools through
this menu. Simply move the mouse to highlight one of the menu items
and type the keystrokes you which to associate with that tool (e.g.,
Ctl+Alt+E for the Ellipse). The shortcut should appear on
the menu.
23.4.7 The Dialogs Menu
The Dialogs menu allows the Properties of the
selected object to be modified (if it has modifiable properties). For
shape objects you can, for example, select line width, colour, and
 style and a fill colour. The fill can be made transparent (by
specifying that the background should not be drawn).
style and a fill colour. The fill can be made transparent (by
specifying that the background should not be drawn).
You can also edit the Layers.
Your donation will support ongoing availability and give you access to the PDF version of this book. Desktop Survival Guides include Data Science, GNU/Linux, and MLHub. Books available on Amazon include Data Mining with Rattle and Essentials of Data Science. Popular open source software includes rattle, wajig, and mlhub. Hosted by Togaware, a pioneer of free and open source software since 1984. Copyright © 1995-2022 Graham.Williams@togaware.com Creative Commons Attribution-ShareAlike 4.0